Name Server and DNS
Before installing the FreeNas server, the DNS and DHCP service was running on my Linux desktop as this tends to be left running continuously. The service has a very light foot print in terms of storage required, memory and CPU usage. This made it an ideal candidate for moving to the FreeNas.
A brief introduction to FreeNAS Jails
FreeNAS 9.1 has introduced the BSD jail functionality. If you’re not used to the terminology you can think of them sitting about halfway down the virtualisation continuum moving from range
- No virtualisation
chroot: processes run in a fake environment. Linux often uses this for services like postfix.- Jail: processes run in a virtual environment which gives a higher level of protection than
chroot - Full virtualisation – provided by services like VMWare, KVM. Highest security. In effect you are running multiple distinct machines on the same hardware
A jail resembles a full system, but without most of the support services and programs. It is typically given just enough to run the service it is designed to provide. Jails can have their own addresses, separate from the host OS, so from a client perspective it will not be aware that the services are running on the same machine.
Jails can be configured to run a single service, or they can be utilised to provide a system that resembles a full operating system.
Because I want to run a number of small services, I choose to have each service running in its own jail. This also means that during testing and configuring a new system you are free to stop/start/delete and start over without impacting on any of the other services running.
Setting up a service
Selecting the Jail button from the top of the Freenas administration screen will pop up a dialog asking to the name of the jail.
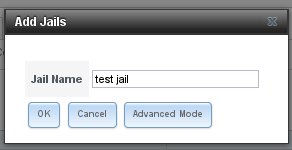
I need to set a few more things, so clicking on the Advanced Mode button gives a more helpful dialog (split into two parts top show all options)

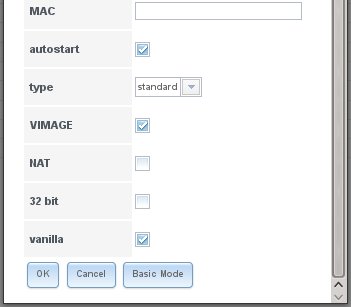
The top option is the IP address. You’ll need to decide on your own numbering scheme. If you are providing a service, then typically you want a static IP address, so all clients know where the service is located. In a small business or home environment this is also the easiest way to configure things.
If the service needs to access the wider world, you can add the gateway address. If you don’t require the service to be seen outside your own network, or it has no reason to query the wider world, then this can be left blank. Because this service is going to provide name services, it does need a gateway so that it can query outside name servers.
In order to use either FreeBSD packages which are either in
- PC-BSD PBI or
- FreeBSD pkgng
format, you must un-tick the vanilla option and select either
- Port
- Standard
from the type drop down.
The system will work away for a bit and then create and start the jail.
Changing into the jail
Use ssh to login into the FreeNAS server. Use the jls command to see which jails are running and to get the id of the jail. Each time a jail is started the Jail ID (JID) is incremented, so if you repeatedly stop and start a jail, its JID will keep increasing.
[fred@freenas ~]$ ssh root@freenas
root@localhost's password:
Last login: Mon Sep 05 13:42:24 2013 from 192.168.10.237
FreeBSD 9.1-STABLE (FREENAS.amd64) #0 r+1a51513: Wed Jul 31 21:54:30 PDT 2013

        FreeNAS (c) 2009-2013, The FreeNAS Development Team
        All rights reserved.
        FreeNAS is released under the modified BSD license.

        For more information, documentation, help or support, go here:
        FreeNAS Storage Operating System | Open Source
Welcome to FreeNAS at home
freenas# jls
   JID  IP Address      Hostname                      Path
     3  -               dhcp_dns                      /mnt/volume1/jails/dhcp_dns
freenas# jexec 3 /bin/csh
root@dhcp_dns:/ # pwd
/
root@dhcp_dns:/ # ls
+COMPACT_MANIFEST       bin                     lib                     proc                    sys
.cshrc                  boot                    libexec                 rescue                  tmp
.profile                dev                     media                   root                    usr
COPYRIGHT               etc                     mnt                     sbin                    var
root@dhcp_dns:/ # ifconfig
lo0: flags=8049<UP,LOOPBACK,RUNNING,MULTICAST> metric 0 mtu 16384
        options=600003<RXCSUM,TXCSUM,RXCSUM_IPV6,TXCSUM_IPV6>
        inet6 ::1 prefixlen 128
        inet6 fe80::1%lo0 prefixlen 64 scopeid 0x1
        inet 127.0.0.1 netmask 0xff000000
        nd6 options=21<PERFORMNUD,AUTO_LINKLOCAL>
epair2b: flags=8843<UP,BROADCAST,RUNNING,SIMPLEX,MULTICAST> metric 0 mtu 1500
        options=8<VLAN_MTU>
        ether 02:24:7f:00:0d:0b
        inet 192.168.10.3 netmask 0xffffff00 broadcast 192.168.10.255
        inet6 fe80::24:7fff:fe00:d0b%epair2b prefixlen 64 scopeid 0x2
        nd6 options=21<PERFORMNUD,AUTO_LINKLOCAL>
        media: Ethernet 10Gbase-T (10Gbase-T )
        status: active
root@dhcp_dns:/ #
I’ve also run the ifconfig command and you can see the ip address is 192.168.10.3 (I use the low end numbers for networking equipment and services).
Instructions for Installing PostgreSQL on FreeNas 9.1 are here.
Instructions for installing DNSMasq on FreeNas are here.